


Here’s the frustrating thing about a bad window install: it looks exactly like a good one on the day the crew drives off. The trim is on, the glass is clean, everyone’s tired and happy. The difference doesn’t show up until later — a draft in February, a stain after a hard rain, a sash that starts sticking every summer.
I install and inspect these, and the reassuring part is that the tells are readable if you know them. A bad install leaves a specific set of fingerprints, most of them things you can see or feel without a single tool.
So this page is a field guide. What the signs are — day one, and months later — which one matters most, and exactly what to do about each. Because almost all of it is fixable, and the sooner you catch it, the easier that is.
What are the signs of a bad window install? Early: a draft with the window shut, visible gaps at the frame, a sash that sticks or won’t lock, a frame bowed by over-expanded foam. Later: water stains or bubbling paint, soft trim, and fog between the panes. The single biggest red flag is a caulk-only install — a bead of caulk where a sill pan and lapped flashing should be. Most of these trace to the water-management and shimming steps being rushed. The fix: document it, and use the labor warranty.
Why doesn’t a bad install show up right away?
Because the parts that fail are the parts you can’t see anymore. The sill pan, the flashing, the shims, the foam — all of it disappears behind trim by the end of install day. A rushed job and a careful one are genuinely hard to tell apart once the trim is on.
What separates them is time. A good install is boring: it just quietly works, winter after winter. A rushed one looks identical on day one and then files its report later — a cold stripe you can find with a bare hand, a bloom of stain under a sill, a sash that binds when the house shifts with the seasons.
That delay is exactly why the day-one walk-through matters so much, and why the signs below are worth learning. You’re not looking for drama on install day. You’re looking for the small tells that predict the February story.
What are the signs of a bad window install?
Here’s the full catalog — grouped by when you’ll notice it. Read it once and you’ll have a checklist in your head for both the walk-through and the months after.
The day-one tells (catch these while the crew is still there):
- A draft with the window shut. Run your hand around the frame on a breezy or cold day. Air movement with the sash closed means the perimeter air seal was never properly made.
- Visible gaps at the sill, frame, or where the unit meets the wall. That’s either bad measuring or an uninsulated gap.
- A sash that sticks or won’t lock. The unit isn’t sitting square. A window shimmed square opens, closes, and locks smoothly; one shoved into a racked opening binds from day one.
- A bowed frame from over-foamed gaps. High-expansion or over-packed foam pushes the frame inward until the sash stops operating. If a sash suddenly binds after the gap was foamed, that’s the cause.
- Crooked or over-caulked trim. Not cosmetic-only — it’s the visible sign of rushed finish work, and it often rides along with rushed everything-else.
The later tells (the ones that surface over months and seasons):
- Water stains, bubbling paint, or soft trim at the window — the signature of water getting into the wall, which points straight back to missing flashing or a missing sill pan.
- Fog between the panes — a failed glass seal. Sometimes a defective unit, but on a new install it’s worth ruling out install-related stress; either way it’s a warranty issue, not a wipe-it-off issue. Here’s what foggy panes actually mean.
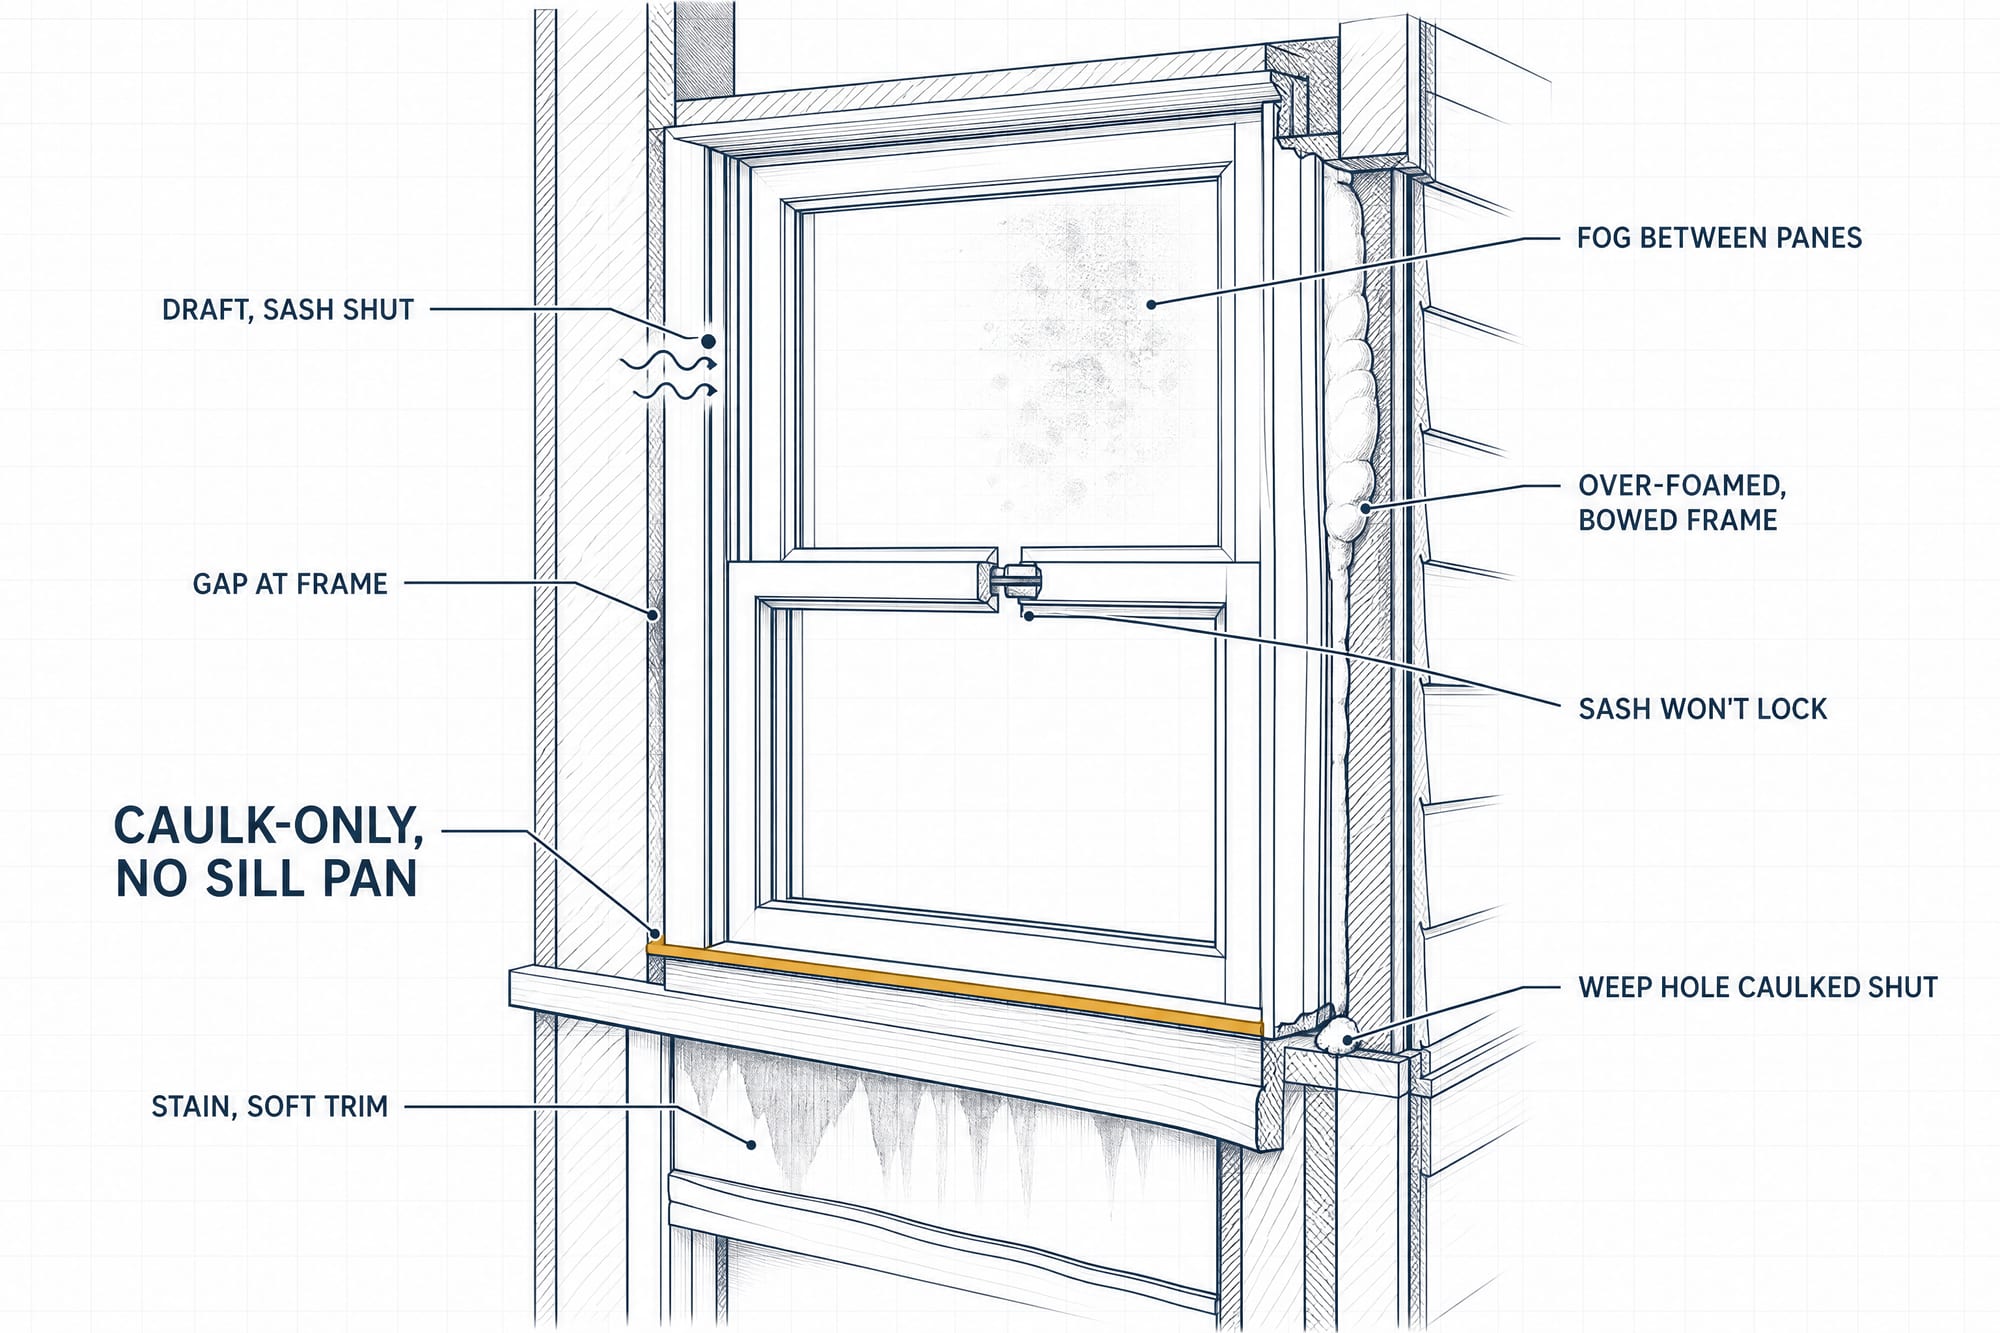
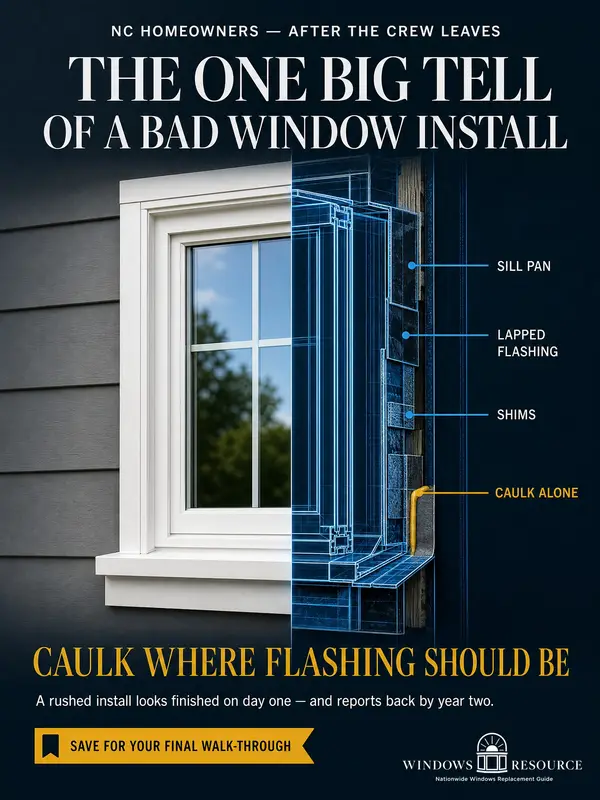
And the one that outranks all the others: a caulk-only install — a bead of exterior caulk with no sill pan and no lapped flashing underneath.
A bead of caulk is a sealant with quiet ambitions of being flashing, and the weather has never once honored them. Caulk seals a joint. It does not manage water. When it shrinks and cracks — and it will — the wall behind it starts drinking. This is the shortcut that costs the most, latest.
Good-install tell vs bad-install tell
Same window, two outcomes — and every difference is visible if you know where to look. This is the comparison I most want in your head, whether you’re watching a crew work or diagnosing a window that’s already giving you trouble.
| What you're looking at | Points to a good install | Points to a bad install |
|---|---|---|
| Under and around the unit | A sill pan and flashing you can see before trim goes on | A bead of caulk only — no pan, no lapped flashing |
| The perimeter, window shut | No air movement; frame feels sealed on a windy day | A draft you can feel with the sash locked |
| Operating the sash | Opens, closes, and locks smoothly | Sticks, drags, or won't latch — the unit isn't square |
| The foamed gap | Filled part-way, frame stays true | Over-foamed and bowed, or left with open gaps |
| The trim and glass | Straight, even reveals; clear glass | Crooked or over-caulked reveals; stains, soft trim, or fog later |
Under and around the unit
- Points to a good install
- A sill pan and flashing you can see before trim goes on
- Points to a bad install
- A bead of caulk only — no pan, no lapped flashing
The perimeter, window shut
- Points to a good install
- No air movement; frame feels sealed on a windy day
- Points to a bad install
- A draft you can feel with the sash locked
Operating the sash
- Points to a good install
- Opens, closes, and locks smoothly
- Points to a bad install
- Sticks, drags, or won't latch — the unit isn't square
The foamed gap
- Points to a good install
- Filled part-way, frame stays true
- Points to a bad install
- Over-foamed and bowed, or left with open gaps
The trim and glass
- Points to a good install
- Straight, even reveals; clear glass
- Points to a bad install
- Crooked or over-caulked reveals; stains, soft trim, or fog later
Notice what almost every “bad” cell has in common: it traces back to a rushed step, not a bad window. The window is usually innocent. The install is on trial. A great window sealed and flashed badly leaks; a mid window installed well performs — which is the whole reason the install beats the brand.
What do I do if I think my install was bad?
Don’t panic, and don’t paper over it. Document, then use the lever you already paid for. Here’s the order I’d go in.
- Document what you’re seeing. Photos of the frame, the trim, the sill, and anything staining — plus a short written note of what happens and when (the draft on cold days, the stain after rain). A dated photo folder is quietly the most persuasive thing in the room.
- Re-read your paperwork for the labor warranty. This is the workmanship warranty from whoever installed — separate from the manufacturer’s product warranty, and usually shorter. Everything on this page is what the labor warranty exists to cover. Know its length and terms before you call.
- Contact the installer in writing and reference the labor warranty directly. A calm, specific message with photos attached (“draft at the frame with the sash locked; visible gap at the lower right; requesting a warranty inspection”) does more than a frustrated phone call.
- Catch it before final payment if you possibly can. That’s your strongest position by a wide margin — the crew’s tools are still out and the balance is still in your hands. The install-day walk-through is built for exactly this.
Can I still fix it after the crew is gone?
Usually, yes — the window is on trial, not condemned. Most install faults are correctable without new windows. A missed air seal gets re-sealed. An out-of-square unit can be re-shimmed. Even the big one — a caulk-only install with no flashing — is fixable by pulling the trim, adding a proper pan and lapped flashing, and re-setting the same unit. The windows themselves are usually fine.
Your leverage changes with time, though. While the labor warranty is live, correction is the installer’s job. Here’s roughly how the position shifts:
- Before final payment — strongest. Withhold the balance until the punch list is done, and reference your walk-through.
- Within the labor-warranty term — strong. This is what the warranty is for; put the request in writing and cite it.
- After the labor warranty expires — harder, but not hopeless. A manufacturer’s product warranty may still cover a genuine product defect (a failed glass seal), even if the install labor isn’t covered. And documented, unresolved water intrusion is worth escalating.
If a company goes unresponsive on significant work, North Carolina homeowners aren’t out of options. Complaints can go to the NC Department of Justice Consumer Protection Section, and for contractors on larger jobs, the NC Licensing Board for General Contractors. Most of the time it never gets there — a documented warranty request handles it.
One honest caveat worth keeping in view: a bad install can also void the manufacturer’s product warranty, because most makers require installation to their instructions. That’s all the more reason to get the install corrected properly and on the record, rather than living with it.
For the whole install from the buying side — what a good scope looks like on paper before anyone touches your wall — the buying red flags page and the full NC installation guide are the companions to this one.
And if you’d rather have a read before you act, send me a few photos and I’ll tell you whether what you’re seeing points to an install problem, and exactly what to ask the company to fix.
Sources, Verification & Fact-Checking verified July 2026
Every load-bearing fact on this page is sourced and verified against a primary authority.
Verified July 2026 via direct review of the cited authority — the links open the controlling source so you can check it yourself rather than take our word.
- Signs of a bad install — drafts with the window shut, visible gaps at the frame, an out-of-square unit (sticking/non-locking sash), an over-foamed or bowed frame, a caulk-only install with no flashing or sill pan, water stains / bubbling paint / soft trim, and fog between the panes: grounded in standard installer and building-science practice. This is the same red-flag list the sibling install-day guide is built from — kept consistent by design.
- Caulk-only installs manage no water; a sill pan plus flashing lapped bottom, then sides, then head, integrated with the wall’s water-resistive barrier, is what sheds water down and out: per U.S. Department of Energy Building Science window-installation guidance. (view source — DOE Building Science, Correct Window Installation Methods)
- The 1/4-inch diagonal tolerance (an opening whose diagonals differ by more than about a quarter inch is out of square, and an out-of-square unit binds and wears early): a widely used installer measuring standard. Hedged as “about” a quarter inch — the exact tolerance varies by product and opening.
- Low-expansion (window-and-door-rated) foam filled part-way, not stuffed; over-filled or high-expansion foam bows the frame and binds the sash: consistent with manufacturer install manuals and standard install practice. Stated as a craft standard, hedged where ranges vary.
- Fog between the panes = a failed insulated-glass seal (a warranty issue, not a cleaning issue); can also indicate a defective unit: covered in depth on the site’s foggy windows page; not restated in numbers here.
- A bad install can void the manufacturer’s warranty (most require installation per the maker’s written instructions), and NFRC ratings assume a correct install: treated in depth on why install beats brand. The warranty-void point is stated as “can,” hedged.
- What to do — document with dated photos, cite the labor (workmanship) warranty in writing, catch faults before final payment; NC escalation paths: the product-vs-labor (workmanship) warranty distinction is covered across the buying cluster. NC consumer escalation via the NC Department of Justice Consumer Protection Section and, for contractors on jobs of $30,000+, the NC Licensing Board for General Contractors. (view source — NC Department of Justice, Consumer Protection; view source — NC Licensing Board for General Contractors)
- Story callout (homeowner feels a draft with the window shut, photographs the gap, cites the labor warranty, crew returns and re-seals it): a homeowner-shared forum pattern, retold as reported — illustrative of the document-then-claim approach, not a verified account of any named company or crew. No installer is identified because the point is the method, not a villain.